Hello Folks,
Yet another new feature in Oracle SOA Suite 12C is Oracle
Enterprise scheduler Service (ESS). ESS is also part of MFT (Brand new
feature to utilize utmost file transfer functionality in SOA 12C-Managed File
Transfer- Will discuss in my next blog).
We used to have lot of challenges while scheduling any service. Third party vendors created many tools for scheduling s
service (To get this functionality adopted) but some vendors could achieve this
some people end up with no result, It’s good that Oracle added this in this
new release, which is very useful in middleware space.
ESS features in
middleware:
Schedule periodic notifications for faulted instances.
Schedule any job without manual triggering.
Long running
services.
Immediate triggering in the background.
Run once at future time or at recurring schedule.
ESS Demo: Quick service
scheduling.
To schedule any service there are two parts of it.
1
Define the job to be scheduled.
2
Submit he job based on the required time intervals.
Here we will see how to schedule a simple SOA service/WS.
Below
is the Home page of ESS.


Go to Job MetadataàJob
Definitions.

Click on NEW to Create/Define new schedule.

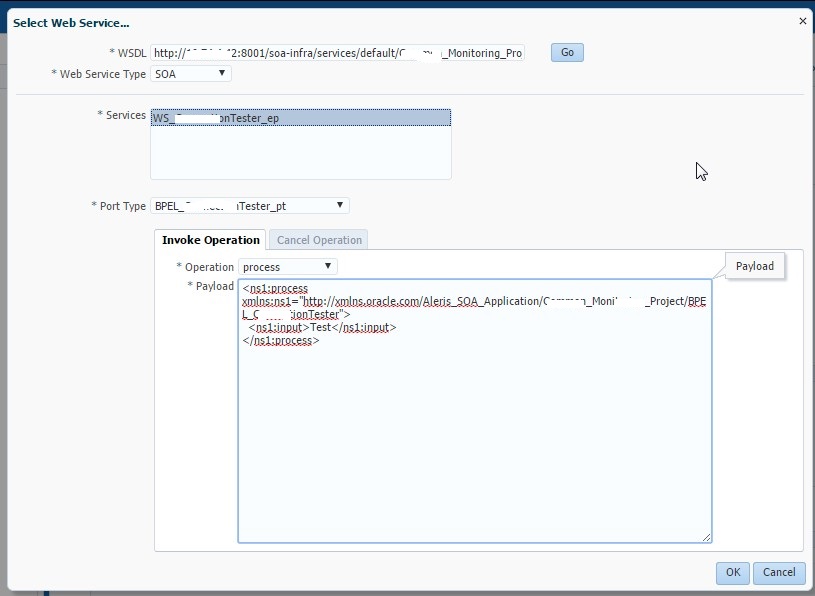
Enter the names and package name, Job Type (Based on the service you can select this type of a job). Click on the Select Web Service

Enter the valid WSDL, which need to be defined /scheduled.
Select the type of the web service.

Once you select SOA as a Web Service Type- You will see
coming service and port type. Select appropriate port type of this service. You
will have opened extended popup to give the input payload. You can give the payload
to test.


Give the payload and say OK.
Now the Job has been defined. You need to submit the schedule next.

Now the job definition is completed. Its time to Submit the job defined.
Drop down Scheduling Service GroupàJob RequestsàSubmit Job Requests.

Enter the submission notes to track
the job details among different jobs.
Enter the Job definition name and
then search.


Upon selecting the defined job we
can see the service section filled with job metadata.

In the schedule part we can see
three parts of it.
1 ONCE: Once is the one time job submission (You can
select the job time-date-year)

2 Use existing schedule- If you
already created schedules then we just browse the schedule and select it.

3 Specify schedule: This one is to
schedule the job with multi frequency, based on time zone with start date. Can
save this schedule to use it in second part again when needed.

Once this is done we can see the job is submitted.

In actions drop down part, we can
see the request log, submitted composite flow trace and other features to
modify the properties.

Upon successful job submission the
job schedule page will be showing the status and count and other statistics.

That’s it for ESS. This is the most
simple and very useful feature in SOA 12C.

